Certification track: Professional Cloud Architect (PCA)
Migration Center — Discovery & Assessment Environment
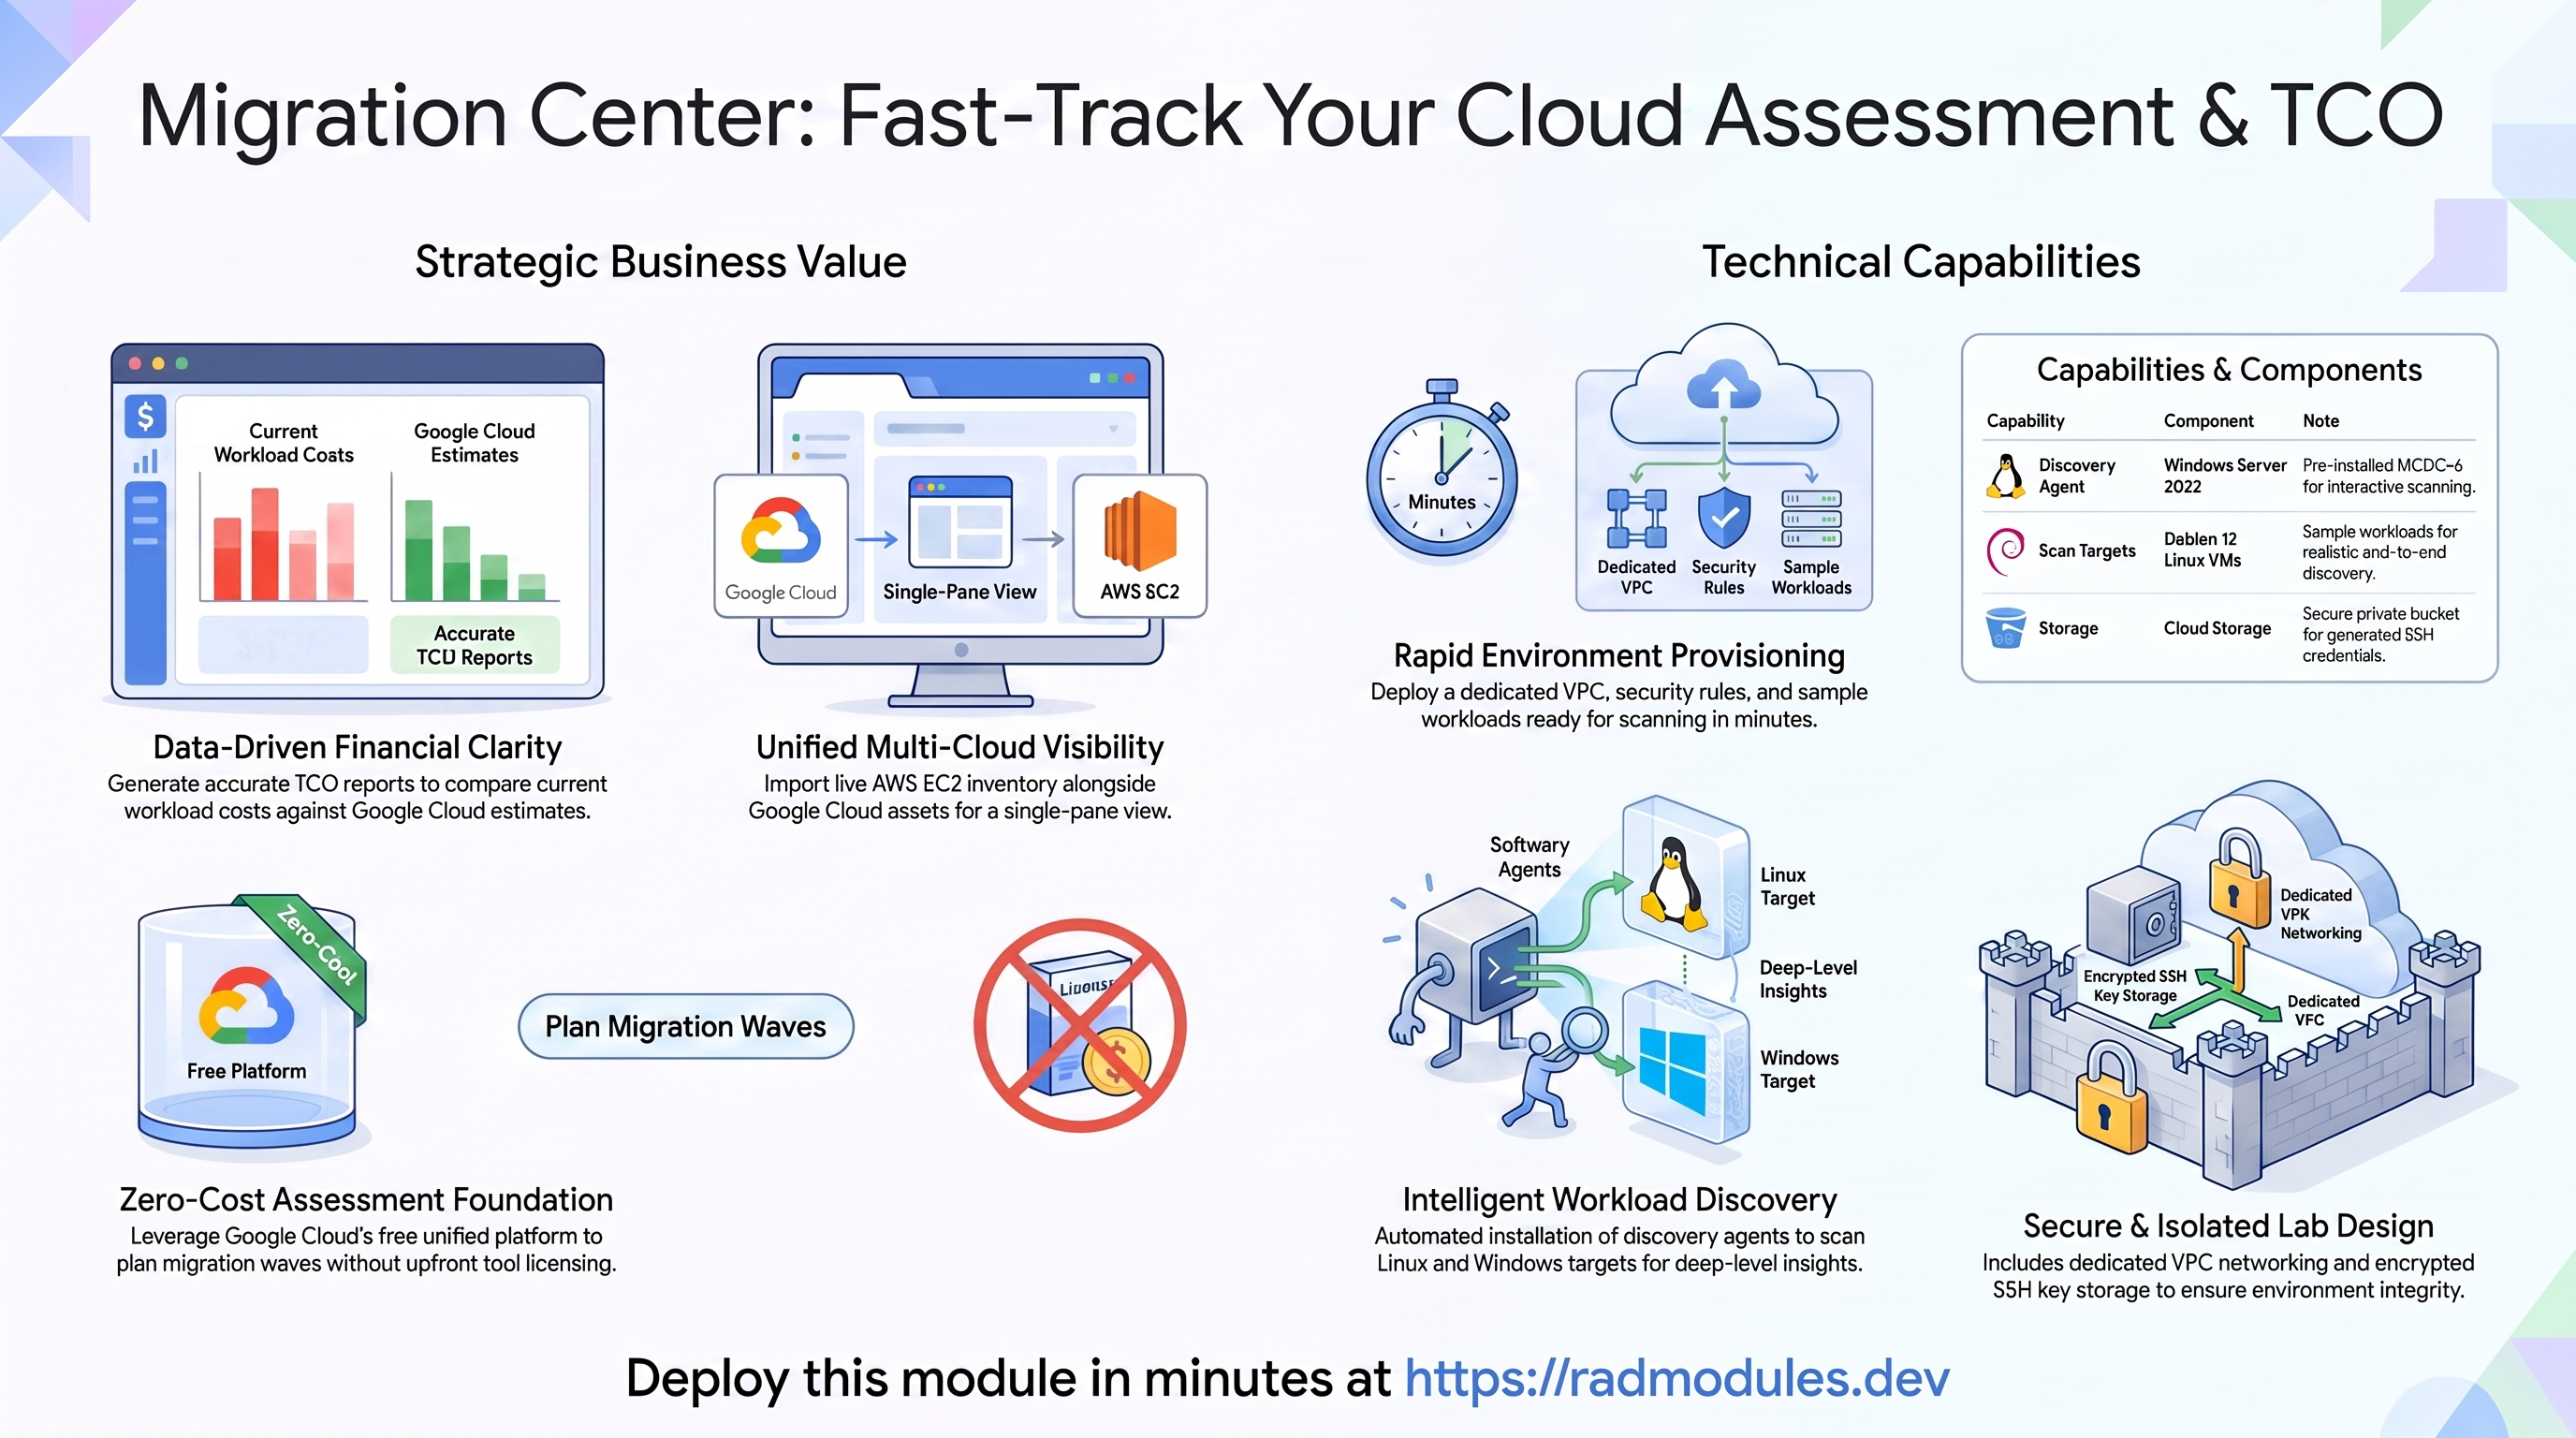
Google Cloud Migration Center is Google Cloud's free, unified platform for the assessment phase of a cloud migration — discovering existing workloads, building an accurate inventory, estimating what they would cost to run on Google Cloud, and planning migration waves. This module deploys a complete, hands-on Migration Center discovery and assessment environment: it initialises the Migration Center service for your project, registers a discovery source, and provisions a set of sample source workloads (a Windows MCDCv6 host plus Debian Linux scan targets) so you can run a realistic end-to-end discovery and produce a Total Cost of Ownership (TCO) report.
This is a standalone module — it does not build on any shared foundation. Everything it needs (a dedicated VPC, firewall rules, sample VMs, an SSH-key bucket, and the Migration Center service objects) is created directly in the target project. Optionally, when AWS credentials are supplied, it also discovers and imports live AWS EC2 inventory alongside the Google Cloud scan results.
This guide focuses on the cloud services the module provisions and how to explore and operate them from the Google Cloud Console, the command line, and the Migration Center REST API.
1. Overview
The module wires together a focused set of Google Cloud services and, optionally, AWS:
| Capability | Cloud service | Notes |
|---|---|---|
| Migration Center service | Migration Center (migrationcenter.googleapis.com) | Initialised for the chosen region; a discovery source is registered automatically |
| MCDCv6 host | Compute Engine — Windows Server 2022 VM | Hosts the MC Discovery Client (MCDCv6), pre-installed by a startup script; RDP-ready |
| Discovery scan targets | Compute Engine — Debian 12 Linux VMs | Sample source workloads (default: 3) scanned by MCDCv6 over SSH |
| SSH key storage | Cloud Storage | A private bucket holding the generated lab-ssh-key.pem for the MCDCv6 SSH credential |
| Network | VPC + firewall rules | Dedicated auto-mode VPC isolating the lab VMs; RDP/SSH/ICMP/internal/HTTP rules |
| AWS EC2 inventory (optional) | AWS IAM + EC2 (via aws provider/CLI) | A scoped read-only IAM user is created and used to query EC2 and import it into Migration Center |
Things to know up front:
- The region is permanent. When Migration Center is first initialised it commits all assessment data to a single Google Cloud region. You cannot change it afterwards without a new project. The module locks in the value of
region(defaultus-central1). - One step is genuinely manual. The MCDCv6 Google sign-in (OAuth) requires an interactive browser session and cannot be scripted. Everything else — service initialisation, source registration, sample VMs, optional AWS import — is automated. After deploy you RDP into the Windows VM, complete the Google login, run the scan, and then build groups/preferences/reports.
- AWS is optional and honest about its cost. Leave
aws_access_key_idempty to skip AWS entirely; no AWS API calls are made and no AWS resources are created. When you do supply credentials, they must be bootstrap credentials with IAM write permissions — the module creates a dedicated, scoped EC2-read-only IAM user (and access key) and runs discovery under that key, not under your bootstrap credentials. TheawsCLI must be available in the execution environment for the import to succeed. - Asset groups, preference sets, and reports are deliberately not pre-created. They are built as hands-on exercises after MCDCv6 discovery data arrives — generating them before the scan would produce empty or misleading results.
- Migration Center objects are not Terraform-managed. The discovery source and any import job are created through REST API calls (not tracked in state). On destroy, the VMs, VPC, firewall, and bucket are removed, but Migration Center objects remain and must be cleaned up via the console/API or by deleting the project.
2. Cloud Services & How to Explore Them
All commands assume PROJECT, REGION, and ZONE are set. Resource names use the pattern migcenter-<id>-…, where <id> is the deployment suffix reported in the Outputs.
A. Migration Center service
On apply the module calls the Migration Center API to initialise the service for the project/region and to register a discovery source of type discovery client. The source ID (reported as mc_source_id) is what MCDCv6 binds to during login, and its display name must match mc_discovery_client_name.
- Console: Migration Center → use the
migration_center_urloutput to jump straight to this project's console. Review Data sources, Assets, Groups, Migration preferences, and Reports. - CLI / REST:
TOKEN=$(gcloud auth print-access-token)
# List discovery sources
curl -s "https://migrationcenter.googleapis.com/v1/projects/$PROJECT/locations/$REGION/sources" \
  -H "Authorization: Bearer $TOKEN" \
  | jq '.sources[] | {id: (.name|split("/")|last), displayName, type}'
# List discovered/imported assets
curl -s "https://migrationcenter.googleapis.com/v1/projects/$PROJECT/locations/$REGION/assets" \
  -H "Authorization: Bearer $TOKEN" \
  | jq '.assets[] | {name: (.name|split("/")|last), os: .machineDetails.guestOsDetails.osName}'
B. The MCDCv6 host (Windows VM)
The Windows Server 2022 VM (migcenter-<id>-winvm01) is the interactive workstation. A PowerShell startup script runs once on first boot and: creates the local migrationcenter user (RDP password m1grat10nc#nt#r), enables RDP, installs Google Chrome (needed for the MCDCv6 OAuth flow), silently installs MCDCv6, and pre-stages a sample AWS CSV import zip in the migrationcenter user's Downloads folder.
- Console: Compute Engine → VM instances → select the Windows VM. Use the external IP (output
windows_vm_external_ip) with an RDP client. - CLI:
gcloud compute instances describe migcenter-<id>-winvm01 --zone "$ZONE" --project "$PROJECT" \
  --format="value(networkInterfaces[0].accessConfigs[0].natIP)"
# Watch the startup script (Chrome/MCDCv6 install) progress:
gcloud compute instances get-serial-port-output migcenter-<id>-winvm01 \
  --zone "$ZONE" --project "$PROJECT" | grep -Ei "mcdc|chrome|lab setup"
RDP credentials are Username: migrationcenter Password: m1grat10nc#nt#r (hardcoded for lab simplicity; also shown in the windows_vm_external_ip output description).
C. The discovery scan targets (Linux VMs)
The Debian 12 Linux VMs (migcenter-<id>-linvm-1…N) are the sample source workloads MCDCv6 scans over SSH. Each VM has the migrationcenter OS user authorised with the generated SSH public key (injected via both instance metadata and a startup script). MCDCv6 reaches them by their internal IPs; the linux_vm_internal_ips output gives you the values to set the MCDCv6 IP scan range.
- Console: Compute Engine → VM instances → filter for
linvm. - CLI:
gcloud compute instances list --filter="name~migcenter AND name~linvm" --project "$PROJECT" \
  --format="table(name, zone, status, networkInterfaces[0].networkIP)"
# Optional: verify SSH manually with the generated key
gcloud storage cp "gs://migcenter-<id>-mc-keys/lab-ssh-key.pem" ./lab-ssh-key.pem --project "$PROJECT"
chmod 600 ./lab-ssh-key.pem
ssh -i ./lab-ssh-key.pem migrationcenter@<linux-vm-internal-ip>
D. SSH key storage (Cloud Storage)
A 4096-bit RSA keypair is generated at deploy time. The public key is placed on each Linux VM; the private key is uploaded as lab-ssh-key.pem into a private bucket (migcenter-<id>-mc-keys) with uniform bucket-level access. During the lab you download this key and load it into MCDCv6 as the Lab-key SSH credential (username migrationcenter).
- Console: Cloud Storage → Buckets → the
migcenter-<id>-mc-keysbucket. - CLI:
gcloud storage ls "gs://migcenter-<id>-mc-keys/" --project "$PROJECT"
The private key is stored as a sensitive value in Terraform state. Restrict access to the state backend and the bucket, and rotate the key after the session if appropriate.
E. AWS source inventory (optional)
When aws_access_key_id is provided, the module provisions a scoped AWS IAM user (mc-ec2-discovery-<id>) with a policy granting only ec2:DescribeInstances, ec2:DescribeInstanceTypes, and ec2:DescribeVolumes, then generates an access key for it. Discovery runs under that scoped key: it queries EC2 in aws_region, builds Migration Center-format CSVs (vmInfo, diskInfo, tagInfo, and an empty perfInfo), then creates, uploads, validates, and runs an import job against the discovery source. The IAM user, policy, and key are removed on destroy.
- Console (GCP): Migration Center → Data sources → the import job; the imported EC2 instances appear under Assets.
- Console (AWS): IAM → Users →
mc-ec2-discovery-<id>. - CLI:
# GCP: list import jobs
curl -s "https://migrationcenter.googleapis.com/v1/projects/$PROJECT/locations/$REGION/importJobs" \
  -H "Authorization: Bearer $(gcloud auth print-access-token)" \
  | jq '.importJobs[] | {displayName, state}'
# AWS: confirm the scoped user exists (using your own AWS credentials)
aws iam list-attached-user-policies --user-name mc-ec2-discovery-<id>
The scoped IAM user's ARN is reported as aws_iam_user_arn (null when AWS is disabled).
F. VPC & firewall
A dedicated auto-mode VPC (migcenter-<id>-vpc) isolates the lab. Auto-mode creates a per-region subnet from the 10.128.0.0/9 range, so all lab VMs in one region reach each other over the internal range — which is how MCDCv6 scans the Linux targets.
- Console: VPC network → VPC networks / Firewall.
- CLI:
gcloud compute networks list --filter="name~migcenter" --project "$PROJECT"
gcloud compute firewall-rules list --filter="network~migcenter" --project "$PROJECT" \
  --format="table(name, direction, sourceRanges.list(), allowed[].map().firewall_rule().list())"
The firewall rules created are: allow-internal (all protocols within the VPC range), allow-ssh (TCP 22), allow-rdp (TCP 3389), allow-icmp, and allow-http (TCP 80/443 to windows-vm-tagged instances, for MCDCv6's outbound reach to Google APIs and OAuth). The first four can be suppressed with create_default_firewall_rules = false if they already exist on the target network.
3. Behaviour
What gets provisioned on apply. The module enables the required APIs, creates the auto-mode VPC and firewall rules, generates the RSA keypair and uploads the private key to a Cloud Storage bucket, deploys the Windows MCDCv6 host and the Debian Linux scan targets, then initialises the Migration Center service for the region and registers the discovery source. If AWS credentials are supplied, it additionally creates the scoped IAM user and runs the EC2 import. Terraform provisioning is fast (roughly 5–8 minutes); the Windows startup script (Chrome + MCDCv6 install) runs in the background and is typically ready within a further 3–5 minutes.
The discovery/assessment workflow. After deploy: RDP into the Windows VM → launch MCDCv6 → complete the Google sign-in (the one manual step) → select the project and enter mc_discovery_client_name so MCDCv6 binds to the pre-registered source → load lab-ssh-key.pem as the Lab-key SSH credential → configure an IP scan range covering linux_vm_internal_ips → run the collection. Discovered Linux assets stream into Migration Center, joining any imported AWS inventory. You then create asset groups and migration preference sets and generate a TCO report from the console (or REST API).
Agents/collectors. MCDCv6 is the agent — it performs guest-OS-level scanning over SSH and collects hardware profiles, OS details, installed software, running processes, network interfaces, and open ports, streaming results to the Migration Center source. CSV import (AWS) brings in hardware/tag inventory but no live OS detail; the contrast between the two depths is part of the learning value.
Manual follow-up. The MCDCv6 OAuth login, the SSH-credential setup, the scan-range configuration, and the creation of groups/preferences/reports are performed by the user after deploy. The module intentionally stops at "service initialised, source registered, sample workloads ready, AWS imported (if configured)".
Cleanup behaviour. Destroy removes all Terraform-managed resources: the Windows and Linux VMs, the VPC and firewall rules, and the Cloud Storage bucket (which uses force-destroy so the key object is removed with it). When AWS is enabled, the scoped IAM user, policy, and access key are also destroyed. Migration Center objects — the discovery source, import jobs, and any groups/preferences/reports you created — are not in Terraform state and survive destroy; remove them via the console/API or by deleting the project. Note that the enabled APIs are left enabled on destroy (so a shared project is not disrupted).
Runtime notes. A single MCDCv6 scan is a point-in-time snapshot; real assessments run MCDCv6 for 2–4 weeks to build a utilisation history for accurate right-sizing. For the lab a single scan is enough to populate the inventory and produce a representative TCO report.
4. Configuration Variables
Variables are grouped exactly as they appear on the deployment platform.
Group 1 — Project & Location
| Variable | Default | Description |
|---|---|---|
project_id | (required) | Target Google Cloud project. Must already exist; the provisioning service account needs Owner. |
region | us-central1 | Region for all resources. Permanently sets the Migration Center assessment region. |
zone | us-central1-a | Zone for the Compute Engine VMs (must be within region). |
Group 2 — Networking
| Variable | Default | Description |
|---|---|---|
create_vpc | true | Create a dedicated auto-mode VPC for the lab. Set false to use an existing network named migcenter-<id>-vpc. |
create_default_firewall_rules | true | Create the four standard rules (allow-internal, allow-ssh, allow-rdp, allow-icmp). Set false if they already exist on the target network. |
internal_traffic_cidr | 10.128.0.0/9 | Source range for the allow-internal rule; matches the auto-mode subnet range. |
Group 3 — Compute Engine
| Variable | Default | Description |
|---|---|---|
create_windows_vm | true | Deploy the Windows Server 2022 MCDCv6 host. The startup script installs MCDCv6 and Chrome automatically. |
windows_vm_machine_type | e2-medium | Machine type for the Windows host (sufficient for MCDCv6 + Chrome). |
windows_vm_boot_disk_size_gb | 50 | Windows boot disk size. Keep ≥ 50 GB for Windows Server 2022 plus MCDCv6. |
linux_vm_count | 3 | Number of Debian Linux scan targets. Set 0 to deploy none. |
linux_vm_machine_type | e2-medium | Machine type for each Linux target. |
linux_vm_boot_disk_size_gb | 20 | Boot disk size for each Linux target. |
Group 7 — SSH Key Storage
| Variable | Default | Description |
|---|---|---|
create_ssh_key_bucket | true | Create a Cloud Storage bucket and store the generated lab-ssh-key.pem. The bucket name is surfaced in the outputs for retrieval. |
Group 8 — Migration Center
| Variable | Default | Description |
|---|---|---|
initialize_migration_center | true | Initialise the Migration Center service and register the discovery source. Set false to provision only the VMs/VPC/bucket. |
mc_discovery_client_name | mc-discovery-client | Display name of the discovery source. Must be entered verbatim in MCDCv6 during login or scan results land in an unregistered source. |
aws_access_key_id | "" | Bootstrap AWS Access Key ID with IAM write permissions. Leave empty to skip AWS entirely. When set, the module creates a scoped EC2-read-only IAM user and imports live EC2 inventory. (sensitive) |
aws_secret_access_key | "" | Bootstrap AWS Secret Access Key matching the Access Key ID above. (sensitive) |
aws_region | us-east-1 | AWS region to discover EC2 instances from. Only consulted when AWS credentials are provided. |
5. Outputs
| Output | Description |
|---|---|
deployment_id | The deployment suffix embedded in all resource names. |
project_id | Target Google Cloud project. |
windows_vm_name | Name of the Windows MCDCv6 host (null when not created). |
windows_vm_external_ip | External IP for RDP. Username migrationcenter, password m1grat10nc#nt#r. |
linux_vm_names | Names of the Debian Linux scan targets. |
linux_vm_internal_ips | Internal IPs of the Linux targets — use these to set the MCDCv6 IP scan range. |
ssh_key_bucket_name | Cloud Storage bucket holding lab-ssh-key.pem (null when not created). |
ssh_key_user | Linux username for the SSH credential (migrationcenter). |
mc_discovery_client_name | Name to enter in MCDCv6 during login (must match exactly). |
migration_center_url | Direct URL to this project's Migration Center console. |
mc_source_id | The registered discovery source ID (null when initialisation is disabled). |
vpc_name | Name of the lab VPC network. |
aws_iam_user_arn | ARN of the scoped EC2-read-only IAM user (null when AWS integration is disabled). |
6. Configuration Pitfalls & Sensible Defaults
Risk: Critical (data loss / outage / security) — High (service degraded) — Medium (cost or partial degradation) — Low (minor).
| Setting | Sensible value | Risk | Consequence if wrong |
|---|---|---|---|
region | set once, correctly | Critical | The Migration Center assessment region is permanent. To change it you must use a new project — all assessment data is region-bound. |
mc_discovery_client_name | match it in MCDCv6 | High | The value must be typed verbatim (case-sensitive) into MCDCv6 at login. A mismatch creates a second, unregistered source and scan results never reach the expected source. |
aws_access_key_id / aws_secret_access_key | both or neither | High | Both must be supplied together. The bootstrap key must have IAM write permissions (iam:CreateUser, iam:CreatePolicy, iam:AttachUserPolicy, iam:CreateAccessKey and their delete counterparts) — EC2-read-only credentials fail at the IAM-provisioning step. The aws CLI must be present in the execution environment. |
aws_region | the region holding your EC2 | Medium | Only consulted when AWS credentials are set; a wrong region imports zero instances (the import step then no-ops). |
create_vpc + create_default_firewall_rules | true / true | Medium | With create_vpc = false, a network named migcenter-<id>-vpc must already exist (there is no custom-name variable). Creating firewall rules against a missing VPC fails the apply. |
create_ssh_key_bucket | true | Medium | With false, the private key exists only in Terraform state — there is no lab-ssh-key.pem to download, so the MCDCv6 SSH-credential step has nothing to load. |
| RDP credentials | rotate for anything non-lab | High | The Windows VM user/password are hardcoded for lab convenience and allow-rdp is open to 0.0.0.0/0. Restrict the source range and change the password for any non-throwaway use. |
lab-ssh-key.pem exposure | restrict bucket + state | High | The RSA private key lives in state and in the bucket. Lock down both, and rotate after the session. |
linux_vm_count | 3 | Low/Medium | Higher counts give richer inventory but cost more; 0 deploys no scan targets (only AWS import would then populate assets). |
| Migration Center objects on destroy | clean up manually | Medium | Sources, import jobs, groups, preferences, and reports are not in Terraform state and survive destroy. Remove them via the console/API or by deleting the project. |
| MCDCv6 single-scan right-sizing | run longer for real work | Medium | A single scan understates real demand; production assessments collect 2–4 weeks of utilisation before trusting right-sizing recommendations. |