Certification track: Professional Cloud Network Engineer (PCNE) · Professional Cloud Security Engineer (PSE)
Istio on GKE
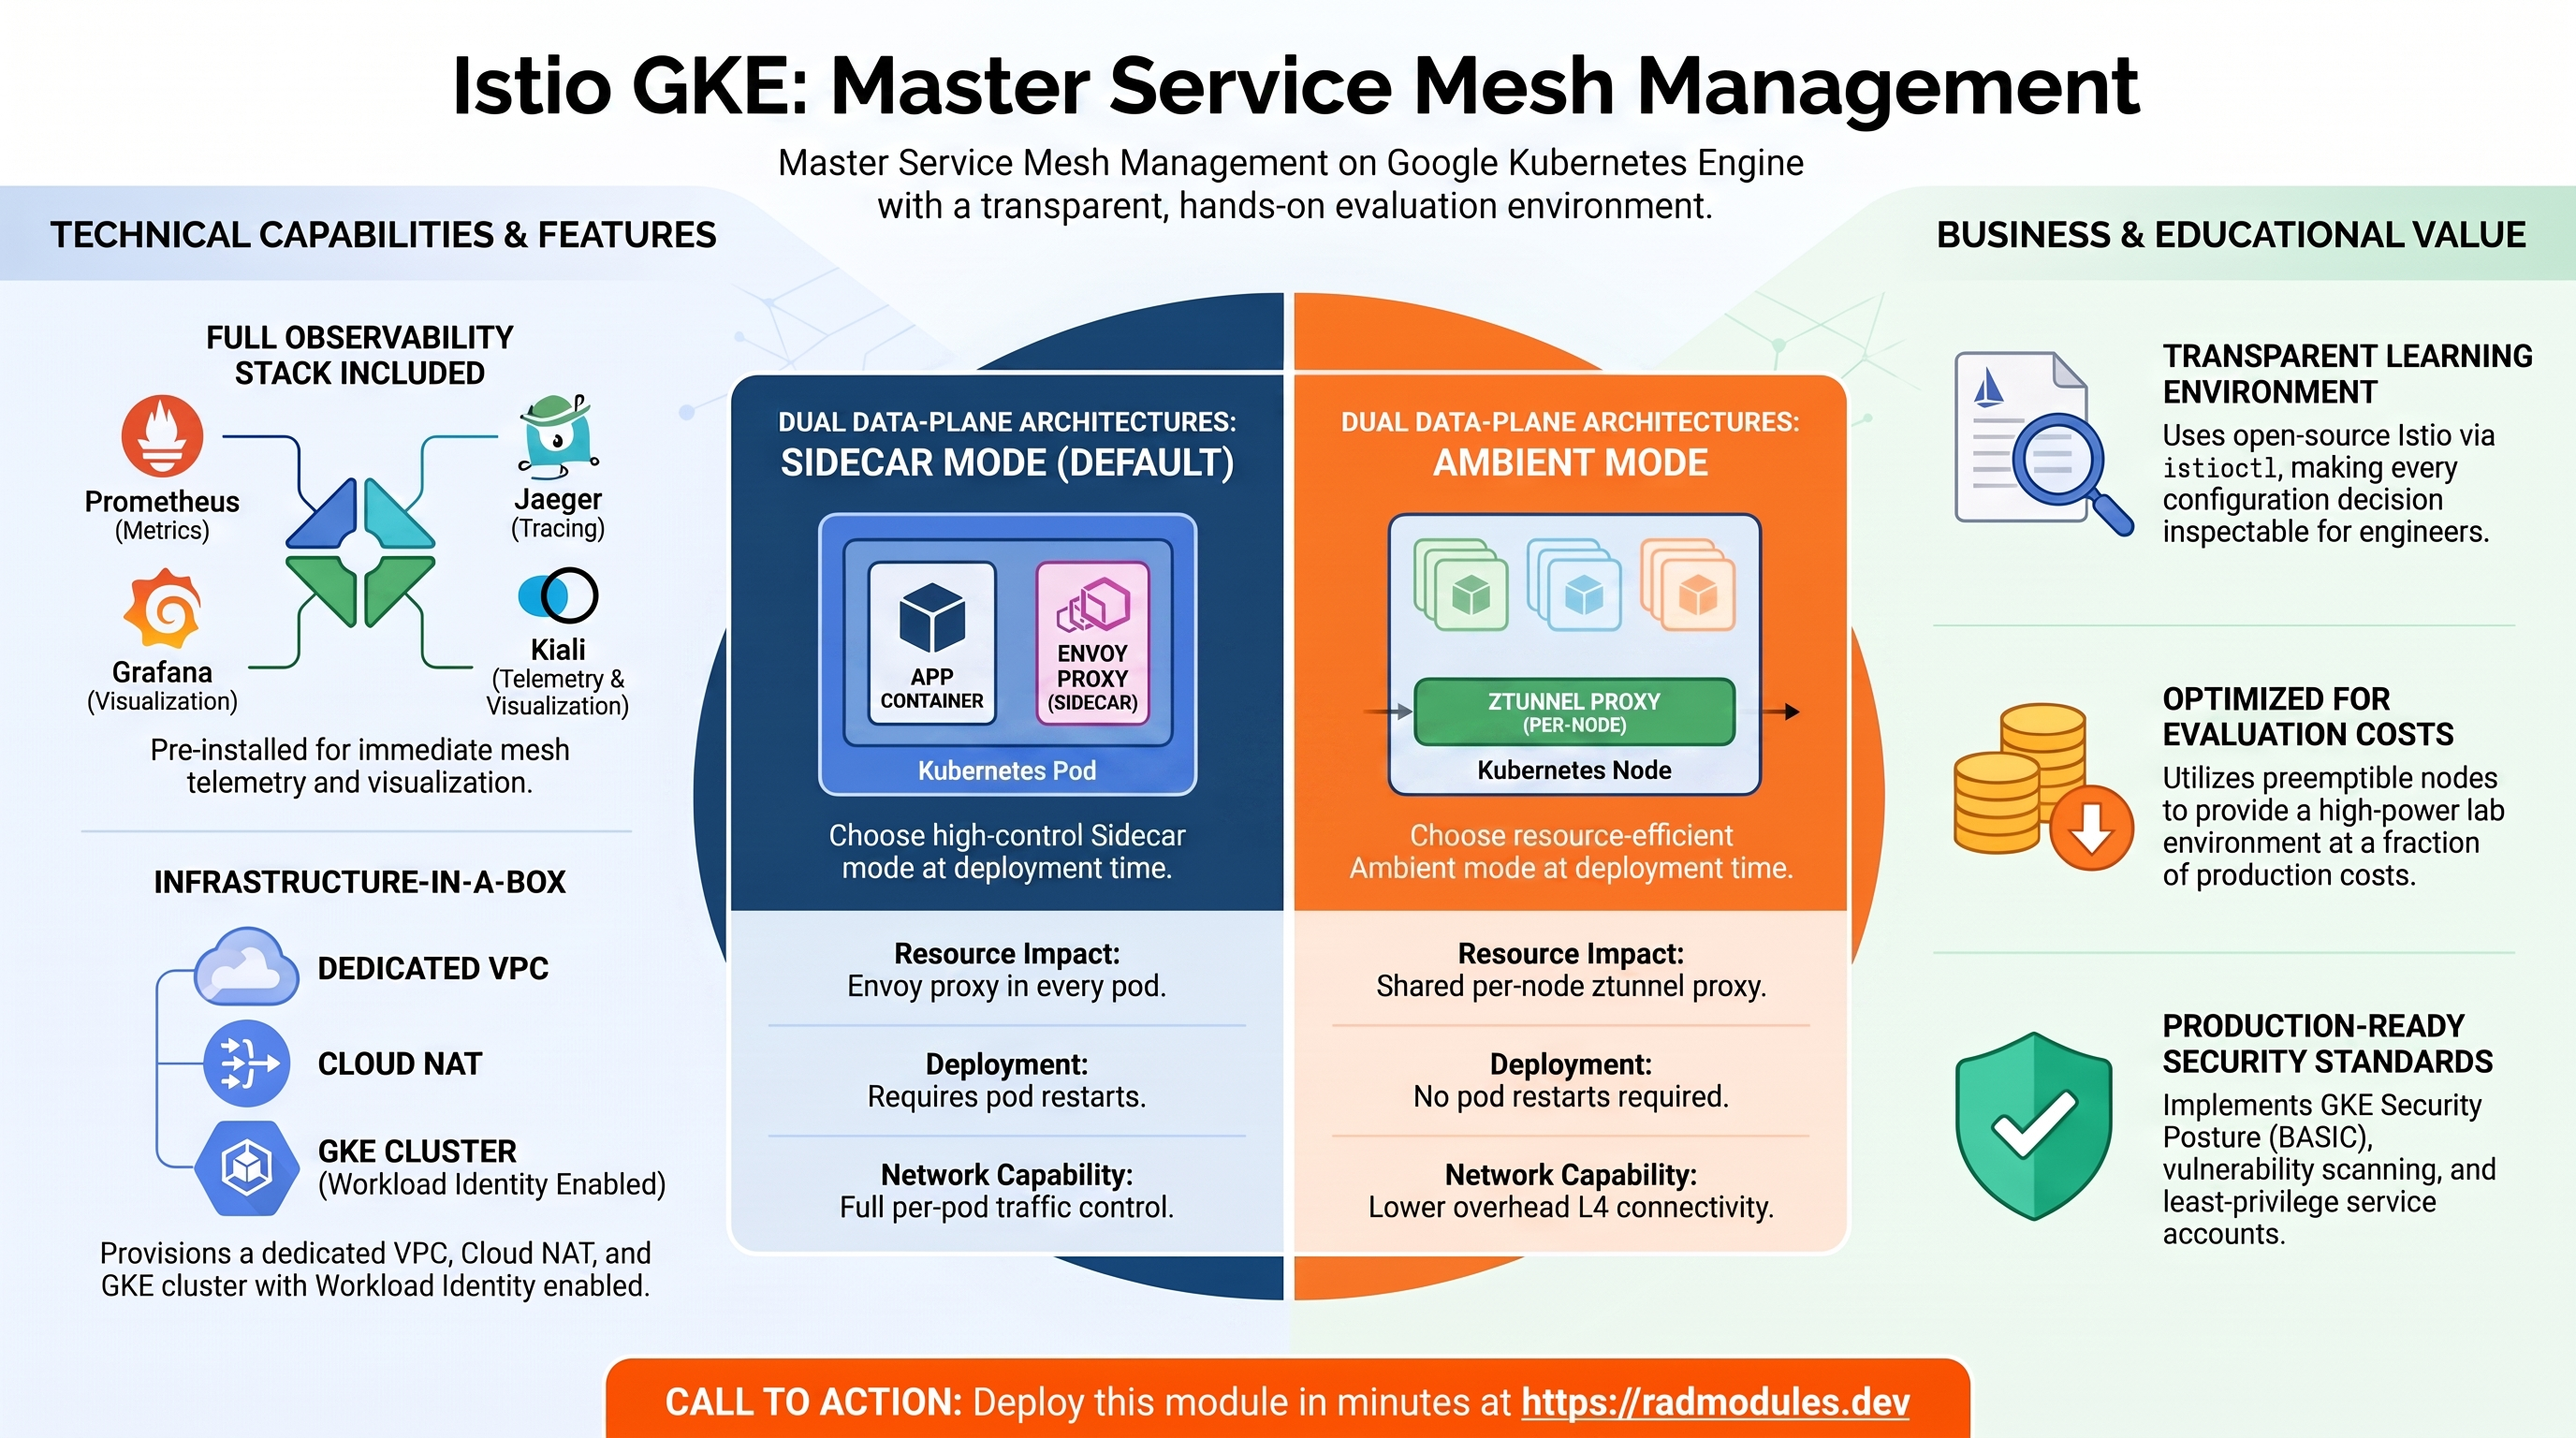
This module stands up a GKE Standard cluster and installs the open-source Istio service mesh onto it — the upstream CNCF project that underpins Google Cloud Service Mesh and many other managed mesh offerings. Istio is installed directly with istioctl, so every configuration decision is transparent and inspectable, making this an ideal hands-on environment for platform engineers learning how a service mesh works from the ground up.
At deploy time you choose one of two data-plane architectures: sidecar mode (an Envoy proxy injected into every pod for full per-pod traffic control) or ambient mode (a shared per-node ztunnel proxy plus optional waypoint proxies, with much lower resource overhead). Alongside Istio, the module installs the full open-source observability stack — Prometheus, Jaeger, Grafana, and Kiali — so you can explore mesh telemetry immediately. This is a standalone infrastructure module: it provisions its own VPC, cluster, and networking, and does not build on any shared foundation.
This module is intended for educational and evaluation purposes.
1. Overview
| Capability | Google Cloud service | Notes |
|---|---|---|
| Compute | GKE Standard cluster | 2 × preemptible e2-standard-2 nodes in a single node pool; you manage node configuration directly (not Autopilot) |
| Networking | VPC network + subnet | Custom-mode VPC, global routing, VPC-native (alias IP) with secondary ranges for pods and services |
| Egress | Cloud Router + Cloud NAT | Private nodes reach the internet (GitHub, container registries) through NAT during the Istio install |
| Identity | Workload Identity + dedicated node service account | Least-privilege node SA; pods get a GCP identity without key files |
| Service mesh | Open-source Istio (via istioctl) | Sidecar or ambient mode, plus an Istio Ingress Gateway exposed via an external LoadBalancer |
| Observability | Prometheus, Jaeger, Grafana, Kiali | In-cluster open-source add-ons installed into istio-system; GKE Managed Prometheus also enabled at the cluster level |
| Security posture | GKE Security Posture, Gateway API | BASIC posture + vulnerability scanning; Gateway API standard channel enabled |
Things to know up front:
- GKE Standard, not Autopilot. You control the node pool, machine type, and cluster settings directly. The cluster permits the
NET_ADMINcapability, which sidecar mode needs for its traffic-interception setup. - Sidecar is the default.
install_ambient_meshdefaults tofalse(sidecar mode). Set it totruefor ambient mode. The mode is chosen at deploy time, and switching it requires a redeploy. - The Istio install runs as a deploy-time step. After the cluster is created, the platform downloads
istioctl, installs Istio with the selected profile, labels thedefaultnamespace for mesh enrolment, and installs the four observability add-ons. Transient add-on failures are logged as warnings and do not fail the deploy. - The Ingress Gateway gets a public IP. Both modes install an
istio-ingressgatewayService of typeLoadBalancer, which provisions a GCP external load balancer. Allow 1–2 minutes after install for the IP to be assigned. - No demo application is provisioned. The mesh and observability stack are installed, but no sample workload is deployed by the module. To explore traffic management you deploy your own workloads (or the Istio Bookinfo sample) into the
defaultnamespace, which is already labelled for mesh enrolment. - Preemptible nodes. Nodes can be reclaimed with ~30 seconds notice. This keeps costs low for a learning environment but is not suitable for production.
2. Google Cloud Services & How to Explore Them
All kubectl / istioctl commands assume you have fetched cluster credentials first (the exact command is returned in the cluster_credentials_cmd output):
gcloud container clusters get-credentials <gke_cluster> --region <region> --project <project>
A. GKE Standard cluster
The cluster runs a single node pool of two preemptible e2-standard-2 nodes with VPC-native networking, Workload Identity, GKE Security Posture (BASIC), Managed Prometheus, and the Gateway API standard channel enabled.
- Console: Kubernetes Engine → Clusters → select the cluster → Details (release channel, version), Nodes (node pool), Security (Workload Identity, Security Posture).
- CLI:
gcloud container clusters describe <gke_cluster> --region <region> --project <project> \
  --format="value(currentMasterVersion,releaseChannel.channel)"
kubectl get nodes -o wide
kubectl top nodes
B. VPC networking, firewall, and Cloud NAT
A custom-mode VPC with one subnet (secondary ranges for pods and services), firewall rules, and a Cloud Router + Cloud NAT for outbound egress. The Istio install depends on NAT to download istioctl and add-on manifests.
- Console: VPC network → VPC networks (subnet + secondary ranges); VPC network → Firewall; Network services → Cloud NAT.
- CLI:
gcloud compute networks subnets describe <subnet_name> --region <region> --project <project>
gcloud compute firewall-rules list --project <project>
gcloud compute routers get-nat-mapping-info cr1-<region> --region <region> --project <project>
C. Istio control plane
istiod (the unified Pilot / Citadel / Galley control plane) and the Istio Ingress Gateway run in the istio-system namespace. istiod pushes Envoy/ztunnel configuration via the xDS protocol and acts as the mesh certificate authority.
- Console: Kubernetes Engine → Workloads → filter namespace
istio-system. - CLI:
kubectl get all -n istio-system
istioctl version
istioctl verify-install
istioctl proxy-status            # all proxies synced to the control plane
istioctl analyze -A              # configuration validation
D. Data plane — sidecar vs ambient
In sidecar mode an Envoy proxy is injected into each pod in a namespace labelled istio-injection=enabled (the module labels default). In ambient mode a ztunnel DaemonSet handles L4 mTLS per node for namespaces labelled istio.io/dataplane-mode=ambient, with optional waypoint proxies for L7.
- CLI (sidecar):
kubectl get namespace default --show-labels        # expect istio-injection=enabled
kubectl get mutatingwebhookconfiguration | grep istio
istioctl proxy-config all <pod> # Envoy config for a pod's sidecar - CLI (ambient):
kubectl get namespace default --show-labels        # expect istio.io/dataplane-mode=ambient
kubectl get daemonset ztunnel -n istio-system
kubectl get pods -n istio-system -l app=ztunnel -o wide
istioctl ztunnel-config workloads
E. Istio Ingress Gateway
A standalone Envoy Deployment fronted by a LoadBalancer Service that provisions a GCP external load balancer — the entry point for traffic into the mesh.
- Console: Kubernetes Engine → Service & Ingress →
istio-ingressgateway; Network services → Load balancing. - CLI:
kubectl get svc istio-ingressgateway -n istio-system
# Read the external IP from the Service (the external_ip output is not reliably populated):
kubectl get svc istio-ingressgateway -n istio-system \
  -o jsonpath='{.status.loadBalancer.ingress[0].ip}'; echo
F. Observability stack
Prometheus, Jaeger, Grafana, and Kiali are installed into istio-system. They are reached by port-forwarding (the module does not expose them externally). GKE Managed Prometheus runs alongside them at the cluster level.
- Console: Monitoring → Metrics Explorer (Managed Prometheus / PromQL); Kubernetes Engine → Workloads (
istio-system) for the add-on pods. - CLI:
kubectl get pods -n istio-system -l 'app in (prometheus,grafana,jaeger,kiali)'
kubectl port-forward svc/kiali 20001:20001 -n istio-system        # http://localhost:20001
kubectl port-forward svc/grafana 3000:3000 -n istio-system        # http://localhost:3000
kubectl port-forward svc/tracing 16686:80 -n istio-system         # Jaeger UI
kubectl port-forward svc/prometheus 9090:9090 -n istio-system
G. Cloud Logging & Monitoring
Cluster system and workload logs flow to Cloud Logging; cluster and Managed Prometheus metrics flow to Cloud Monitoring.
- Console: Logging → Logs Explorer; Monitoring → Dashboards (GKE / Kubernetes).
- CLI:
gcloud logging read 'resource.type="k8s_container" AND resource.labels.namespace_name="istio-system"' \
  --project <project> --limit 50
3. Behaviour
Deploy-time sequence:
- Enable the required project APIs and wait for the Container API to activate.
- Create the VPC, subnet (with pod and service secondary ranges), firewall rules, and Cloud Router + Cloud NAT — unless
create_network = false, in which case the named existing network and subnet are used. - Create the GKE Standard cluster and a two-node preemptible node pool with a dedicated least-privilege node service account — unless
create_cluster = false, in which case Istio installs onto the named existing cluster. - Run the Istio install as a deploy-time step: download
istioctlfor the requestedistio_version, fetch cluster credentials, create theistio-systemnamespace, and install Istio with the selected profile. - Label the
defaultnamespace for mesh enrolment, then install the Prometheus, Jaeger, Grafana, and Kiali add-ons and run an installation verification.
Sidecar mode (install_ambient_mesh = false, default):
- Istio is installed with mesh identifiers and an autoscaled Ingress Gateway (min 2 / max 5 replicas, CPU target 80%). If that install path fails, the step falls back to a
minimalprofile install. - The
defaultnamespace is labelledistio-injection=enabled. Pods created there receive an Envoyistio-proxysidecar; the cluster permitsNET_ADMINso the sidecar can program traffic interception. Existing pods must be restarted to pick up a sidecar.
Ambient mode (install_ambient_mesh = true):
- Istio is installed with the
ambientprofile plus a LoadBalancer Ingress Gateway, and a resource quota is applied to protect node-critical pods. - A
ztunnelDaemonSet provides per-node L4 mTLS. Thedefaultnamespace is labelledistio.io/dataplane-mode=ambientand a waypoint proxy is applied to it for L7 policy. Enrolment requires no pod restart.
Runtime notes:
- Ingress IP. After install, the Ingress Gateway's external IP takes 1–2 minutes to appear. The deploy logs print it; read it any time with
kubectl get svc istio-ingressgateway -n istio-system. The module'sexternal_ipoutput is best-effort and commonly reportsIP not available— use the Service instead. - No sample application. Although a
deploy_applicationtoggle is present, the current module does not provision a demo workload. Deploy your own services (or the Istio Bookinfo sample bundled with the downloaded Istio release) into the already-labelleddefaultnamespace to exercise traffic management, mTLS, and authorization policies. - Permissive mTLS by default. The mesh accepts both plaintext and mTLS traffic until you apply a
STRICTPeerAuthenticationpolicy — intentional for incremental adoption. - Teardown. Destroy runs a graceful uninstall that removes waypoints/labels, the observability add-ons, the Istio installation, and the
istio-systemnamespace before the cluster and network are torn down. Cleanup steps are best-effort and never block the destroy.
4. Configuration Variables
Grouped exactly as they appear on the deployment platform. Module-metadata settings (Group 0) are managed by the platform and are not shown here.
Group 1 — Project & Region
| Variable | Default | Description |
|---|---|---|
project_id | (required) | Destination GCP project where the cluster and mesh are deployed. Must already exist. |
region | us-central1 | Region for the cluster, VPC, and all regional resources. Ensure sufficient quota. |
Group 2 — Network
| Variable | Default | Description |
|---|---|---|
create_network | true | Create a new VPC and subnet. Set false to install into an existing network/subnet. |
network_name | vpc-network | Name of the VPC — created when create_network = true, otherwise the existing network to use. |
subnet_name | vpc-subnet | Name of the subnet — created or referenced depending on create_network. |
ip_cidr_ranges | ["10.132.0.0/16", "192.168.1.0/24"] | CIDR blocks for the subnet ranges (only used when creating a network). The first is the primary node range. |
Group 3 — GKE Cluster
| Variable | Default | Description |
|---|---|---|
create_cluster | true | Create a new GKE Standard cluster. Set false to install Istio onto an existing cluster. |
gke_cluster | gke-cluster | Name of the cluster — created or referenced depending on create_cluster. |
release_channel | REGULAR | GKE release channel: RAPID, REGULAR, STABLE, or NONE (manual upgrades). |
pod_cidr_block | 10.62.128.0/17 | Secondary range for pod IPs. Must not overlap the node or service ranges. |
service_cidr_block | 10.64.128.0/20 | Secondary range for Service ClusterIPs. Must not overlap the node or pod ranges. |
Group 4 — Istio Features
| Variable | Default | Description |
|---|---|---|
istio_version | 1.24.2 | Open-source Istio version to install (major.minor.patch). Must be supported by the chosen release channel. |
install_ambient_mesh | false | false installs sidecar mode (Envoy per pod); true installs ambient mode (per-node ztunnel + optional waypoints). |
5. Outputs
| Output | Description |
|---|---|
deployment_id | The deployment ID (random suffix) used to make resource names unique. |
project_id | The destination project ID. |
cluster_credentials_cmd | Ready-to-run gcloud container clusters get-credentials command for the cluster. |
external_ip | Best-effort Istio Ingress Gateway external IP. Frequently reports IP not available — read the IP from the istio-ingressgateway Service instead. |
6. Configuration Pitfalls & Sensible Defaults
Risk: Critical (data loss / outage / security) — High (service degraded) — Medium (cost or partial degradation) — Low (minor).
| Setting | Sensible value | Risk | Consequence if wrong |
|---|---|---|---|
pod_cidr_block / service_cidr_block / ip_cidr_ranges | non-overlapping ranges | Critical | Overlapping secondary ranges (with each other or peered/on-prem networks) break cluster creation or cause routing conflicts that are hard to undo. |
install_ambient_mesh | chosen once at deploy | High | The mode is fixed at install time; switching between sidecar and ambient after deploy requires tearing the mesh down and reinstalling. |
istio_version | a real released tag (e.g. 1.24.2) | High | An unavailable or unsupported version fails the istioctl download/install, leaving the cluster without a mesh. |
create_cluster / gke_cluster | match the real target | High | With create_cluster = false, an incorrect gke_cluster name fails the existing-cluster lookup and the install aborts. |
create_network with existing network | correct network_name / subnet_name | High | A wrong existing network/subnet name fails the lookup, or places the cluster in an unintended network. |
| Ingress IP expectations | read from the Service, not external_ip | Medium | Relying on the external_ip output (often IP not available) causes confusion; the LoadBalancer IP is always on the istio-ingressgateway Service. |
release_channel | REGULAR | Medium | RAPID pulls in early Kubernetes versions that may not be validated against the chosen istio_version; NONE disables automatic patching. |
| Preemptible nodes (fixed) | acceptable for labs only | Medium | Both nodes can be reclaimed simultaneously, briefly making the control plane and gateway unavailable. Not for production. |
| Expecting a built-in demo app | deploy your own workload | Low | The module installs the mesh only; nothing serves traffic until you deploy a workload into the default namespace. |
For a hands-on walkthrough of deploying, verifying, operating, observing, and tearing down this module — including exploring sidecar vs ambient mode and the observability stack — see the Istio on GKE lab guide.